Part 1: Hardware
Introduction to Environmental Sensing
|
Monitoring temperature and humidity provides useful data about environmental conditions. This information can be applied in various contexts, such as monitoring room comfort, verifying storage conditions for sensitive materials, or tracking weather patterns.
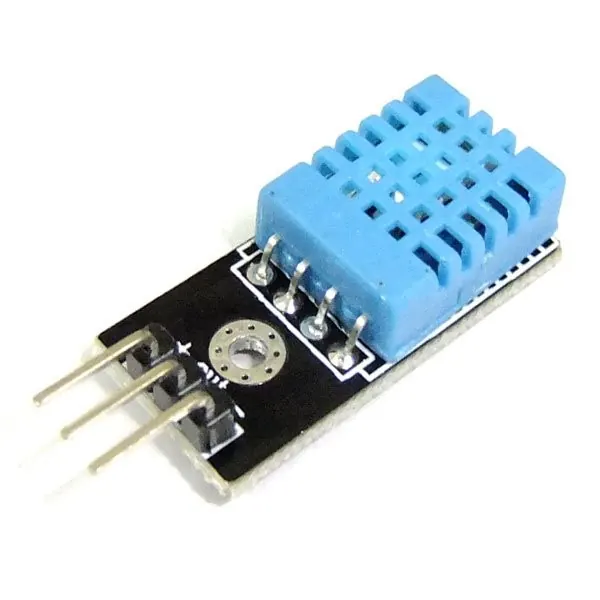
The DHT11 sensor is a digital component that combines both temperature and humidity sensing in a single package, making it accessible for electronic projects. There is also DHT22 sensor which provide greater sensing range and accuracy, but comes with a higher cost. |
 |
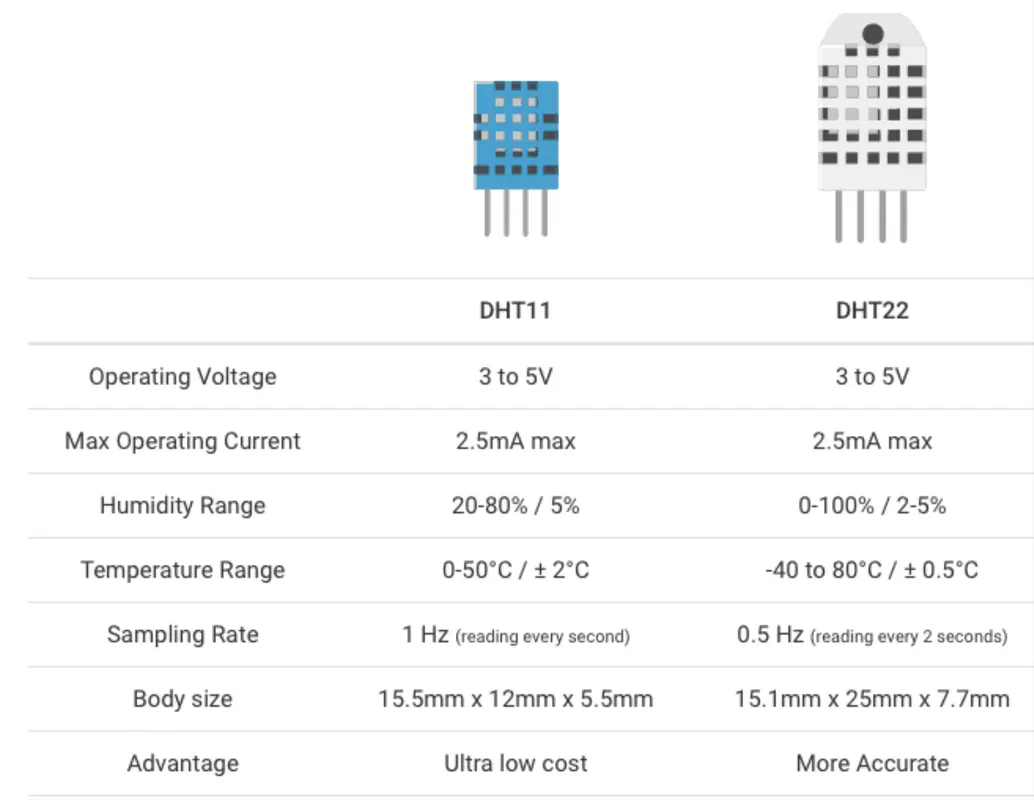
The DHT11 Sensor Characteristics
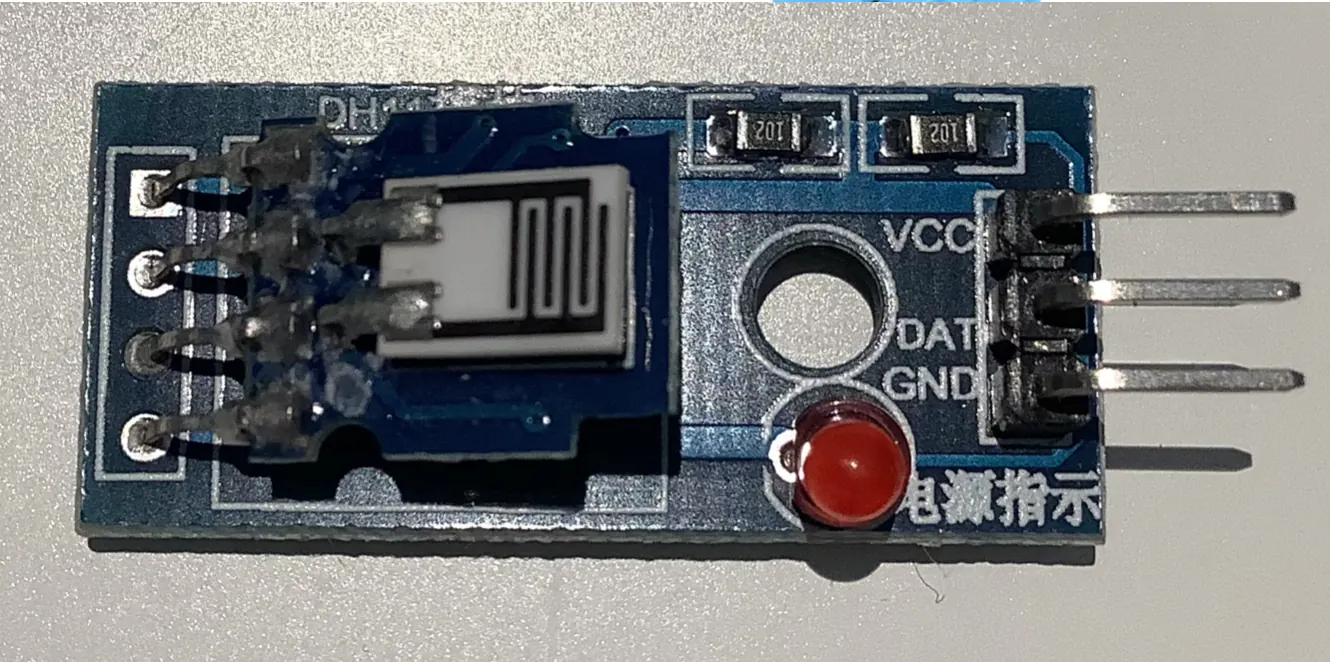 The interior of DHT11
|
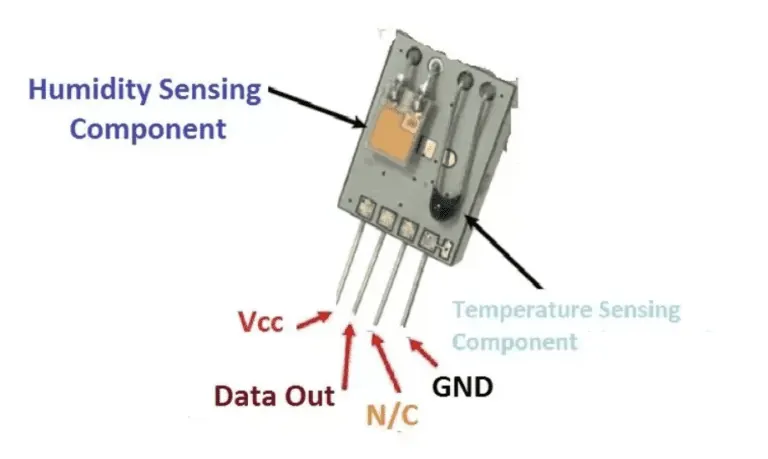 The interior of DHT22
|
The DHT11 sensor contains a capacitive humidity sensor and a thermistor for temperature measurement. It provides digital output through a single data pin, which simplifies connections compared to analog sensors that require additional components. The sensor has a measurement range of 20-80% for relative humidity and 0-50°C for temperature, with accuracy suitable for many basic applications.
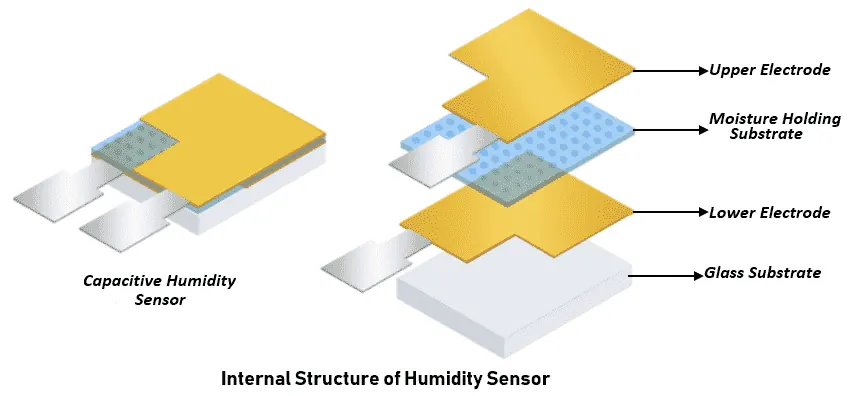
The humidity sensor in the DHT11 operates on a capacitive principle. It contains a moisture-holding substrate placed between two electrodes. As the humidity in the air changes, the substrate absorbs or releases water vapor. This changes its ability to hold an electrical charge (its capacitance). The sensor measures this changing capacitance and converts it into a digital value that corresponds to the relative humidity.
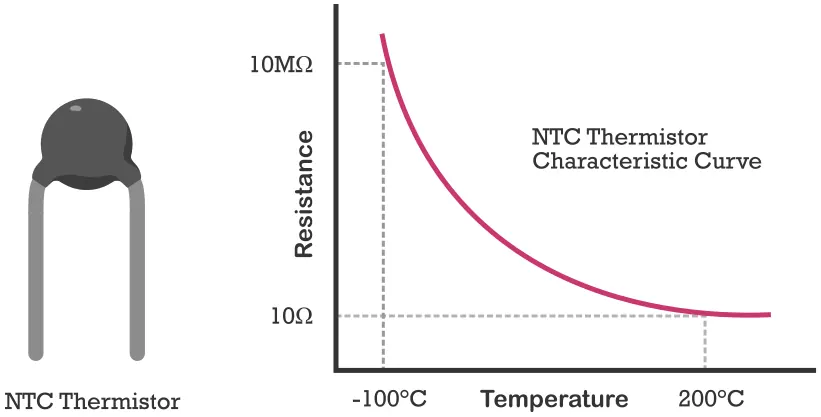
For temperature measurement, the DHT11 uses a thermistor. A thermistor is a type of resistor whose electrical resistance changes predictably with temperature. The sensor passes a small current through the thermistor and measures the resulting voltage. This voltage reading changes as the thermistor's resistance changes with the ambient temperature, allowing the sensor to calculate the current temperature.
Exercise 1: Debugging Excercise
|
Modify the given code to display reading from temperature sensor reading on the LCD screen.
Two steps to complete
#include<Adafruit_LiquidCrystal.h> |
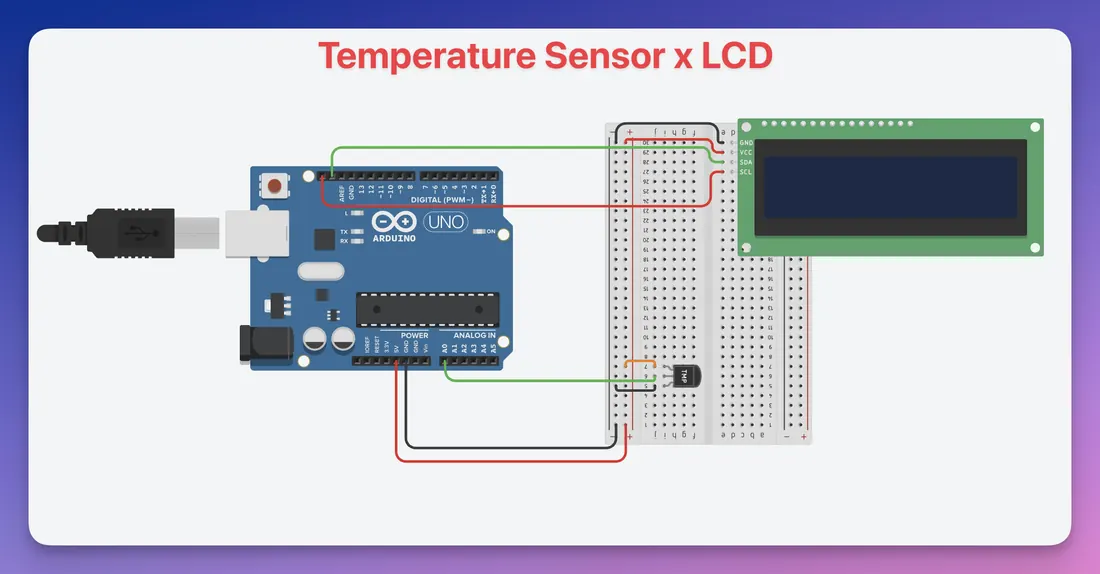 Click the image for the simulation
|
LM35 Temperature Sensor LCD Display
_______________// #HINT - include library  wire.h
_______________// #HINT - include library  Adafruit_LiquidCrystal.h
// MCP23008-based I2C LCD
// Address is usually 0x20 for MCP23008
Adafruit_LiquidCrystal lcd(0);

const int LM35_PIN = ________;       // LM35 output pin
float lastTemp = -999;         // For change detection
unsigned long lastSerialTime = 0;
const unsigned long SERIAL_INTERVAL = 1500; // 1.5 seconds

void setup() {
  Serial.begin(______);  // #HINT - Set baud rate (9600, 115200, etc.)
  lcd.begin(________, __________);  // #HINT - Set LCD columns and rows (16, 2)
  lcd.setBacklight(HIGH);

  lcd.print("Temp Sensor");
  delay(1000);
  lcd.clear();
}

void loop() {
  int sensorValue = analogRead(________);  // #HINT - Use LM35_PIN variable

  // LM35 gives 10 mV per °C (no offset)
  float voltage = sensorValue * (5.0 / 1023.0); // Convert ADC to voltage
  float temperatureC = voltage * 100.0;         // Convert voltage to Celsius

  // Update LCD only if temperature changes ≥ 0.1°C
  if (abs(temperatureC - lastTemp) >= 0.1) {

    lcd.setCursor(______, ______); // #HINT - Set cursor at 0th column, 0th row.
    lcd.print("Temp: ");
    lcd.print(temperatureC, 1);  // One decimal
    lcd.print(" C");
    lcd.print("       ");


    lastTemp = temperatureC;
  }

  // Update Serial Monitor every 1.5 seconds
  if (millis() - lastSerialTime >= SERIAL_INTERVAL) {
    Serial.print("Temperature: ");
    Serial.print(temperatureC, 2);
    Serial.println(" °C");
    lastSerialTime = millis();
  }

  delay(100); // Stability delay
}
Exercise 2: Create temperature animation in Fahrenheit
Modify the code below to show temperature in Fahrenheit as well at the second line of LCD.
Your task is to complete the code by implementing the correct formula to convert the temperature from Celsius to Fahrenheit.
AI Prompt to Use:
"Provide only this line of Arduino code to convert Celsius to Fahrenheit, using the variable 'temperatureC' as input and 'temperatureF' as output. Give only the completed line of code: float temperatureF = "
Your task is to complete the code by implementing the correct formula to convert the temperature from Celsius to Fahrenheit.
AI Prompt to Use:
"Provide only this line of Arduino code to convert Celsius to Fahrenheit, using the variable 'temperatureC' as input and 'temperatureF' as output. Give only the completed line of code: float temperatureF = "
LM35 Temperature Sensor (Celsius & Fahrenheit)
#include <Wire.h>
#include <Adafruit_LiquidCrystal.h>

// MCP23008-based I2C LCD
// Address is usually 0x20 for MCP23008
Adafruit_LiquidCrystal lcd(0);

const int LM35_PIN = A0;       // LM35 output pin
float lastTemp = -999;         // For change detection
unsigned long lastSerialTime = 0;
const unsigned long SERIAL_INTERVAL = 1500; // 1.5 seconds

void setup() {
  Serial.begin(9600);
  lcd.begin(16, 2);
  lcd.setBacklight(HIGH);

  lcd.print("Temp Sensor");
  delay(1000);
  lcd.clear();
}

void loop() {
  int sensorValue = analogRead(LM35_PIN);

  // LM35 gives 10 mV per °C (no offset)
  float voltage = sensorValue * (5.0 / 1023.0); // Convert ADC to voltage
  float temperatureC = voltage * 100.0;         // Convert voltage to Celsius
  float temperatureF = ________________________;   // HINT - use formula to convert temperature from Celsius to Fahrenheit

  // Update LCD only if temperature changes ≥ 0.1°C
  if (abs(temperatureC - lastTemp) >= 0.1) {

    lcd.setCursor(0, 0);
    lcd.print("Temp: ");
    lcd.print(temperatureC, 1);  // One decimal
    lcd.print(" C");
    lcd.print("       ");

    lcd.setCursor(0, 1);
    lcd.print("Temp: ");
    lcd.print(temperatureF, 1);  // One decimal
    lcd.print(" F");
    lcd.print("       ");


    lastTemp = temperatureC;
  }

  // Update Serial Monitor every 1.5 seconds
  if (millis() - lastSerialTime >= SERIAL_INTERVAL) {
    Serial.print("Temperature: ");
    Serial.print(temperatureC, 2);
    Serial.println(" °C");
    lastSerialTime = millis();
  }

  delay(100); // Stability delay
}