Part 1: Hardware
Introduction to Sonar Measurement
|
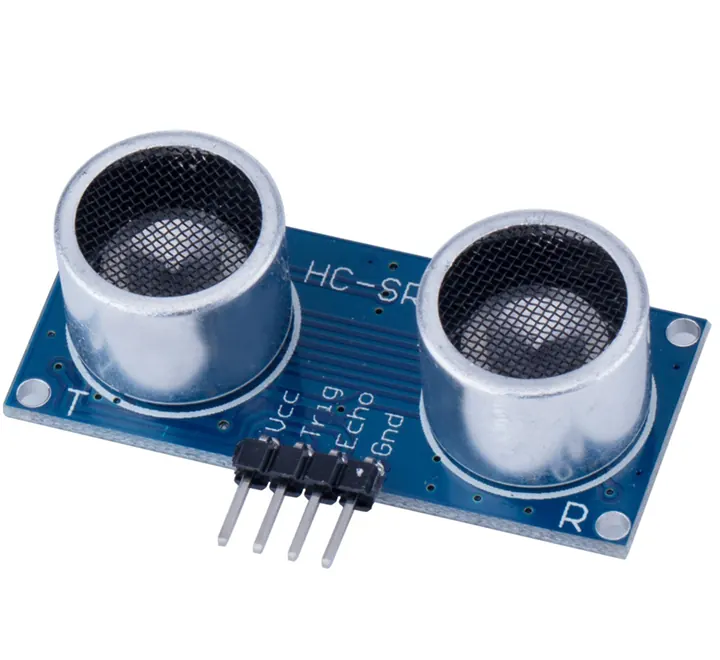
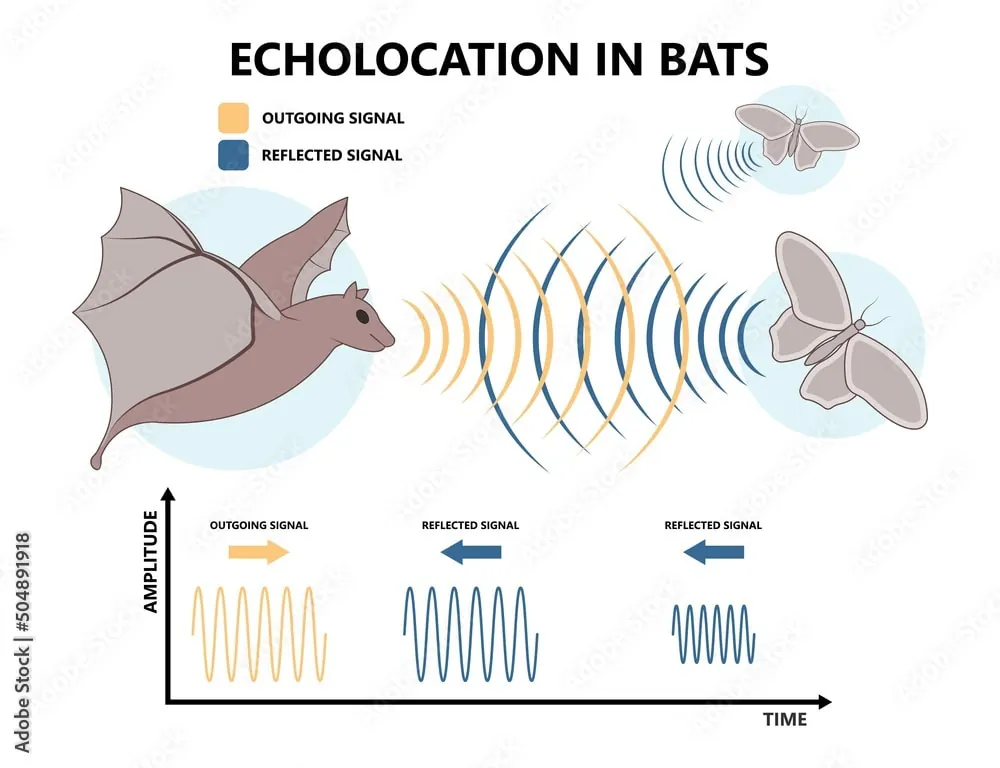
The HC-SR04 ultrasonic sensor uses sound waves to determine the distance to an object. It operates on a principle similar to sonar used by bats and ships: emitting a sound pulse and measuring the time it takes for the echo to return. This method provides a way to measure distance without physical contact, which can be useful for applications like obstacle detection or level measurement.
|
 |
How the HC-SR04 Works
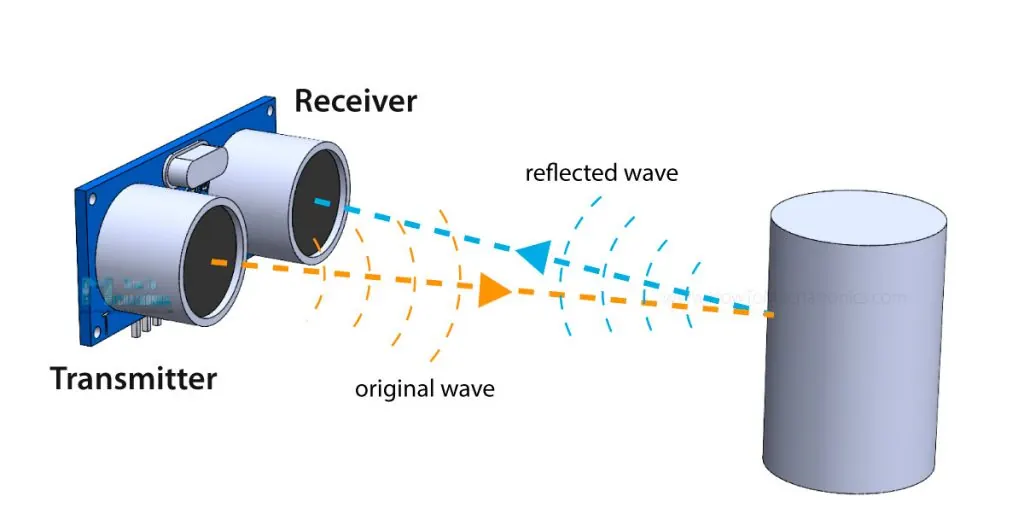
The sensor contains two main components: a transmitter and a receiver. When triggered, the transmitter sends out a short burst of ultrasonic sound at a frequency of 40 kHz, which is inaudible to humans. If this sound wave hits an object, it reflects back toward the sensor. The receiver detects this returning echo. By calculating the time between the emission of the pulse and the detection of the echo, the distance to the object can be determined.
Distance is calculated using the known speed of sound in air, which is approximately 343 meters per second at room temperature. The formula used is:
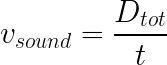
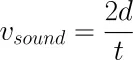

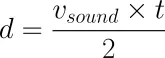
The time is divided by two because the sound wave travels to the object and back. The HC-SR04 sensor provides this time measurement in microseconds, which the Arduino converts into a distance measurement in centimeters or inches.
Connecting the Sensor to Arduino
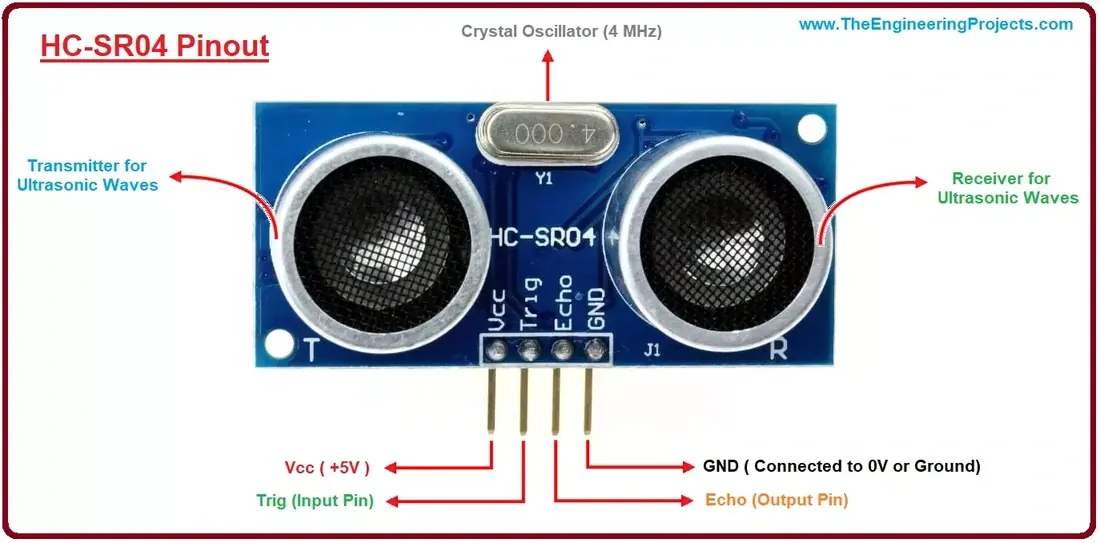
The HC-SR04 requires four connections: power (5V), ground, a trigger pin, and an echo pin. The trigger pin is set as a digital output, while the echo pin is set as a digital input. A brief high signal sent to the trigger pin initiates the measurement cycle. The echo pin then goes high for a duration proportional to the distance measured. This signal timing is managed by the sensor's internal circuitry.
Part 2: Software
Library and Pin Definition
Explanation: Defines constants for the digital pins connected to the sensor's TRIG and ECHO terminals.
Ultrasonic Sensor Pin Setup
const int trigPin = 9;
const int echoPin = 10;
Initializing the Pins
Explanation: Sets the TRIG pin as an OUTPUT to send signals, and the ECHO pin as an INPUT to receive the returning echo pulse.
Ultrasonic Sensor Pin Mode Setup
pinMode(trigPin, OUTPUT);
pinMode(echoPin, INPUT);
Sending the Trigger Pulse
Explanation: Sends a 10-microsecond HIGH pulse to the TRIG pin to initiate the ultrasonic burst.
Ultrasonic Sensor Trigger Pulse
digitalWrite(trigPin, HIGH);
delayMicroseconds(10);
digitalWrite(trigPin, LOW);
Measuring the Echo Duration
Explanation: The pulseIn() function measures the duration of a pulse on a digital pin. It waits for the pin to change to the specified state (HIGH or LOW), starts timing, then waits for the pin to change back to the opposite state, and stops timing. It returns the pulse width in microseconds.
Ultrasonic Sensor Echo Reading
long duration = pulseIn(echoPin, HIGH);
Calculating the Distance
Explanation: Converts the time measurement into distance in centimeters. The constant 0.0343 is the speed of sound in cm/µs. Dividing by two accounts for the sound traveling to the object and back.
Ultrasonic Distance Calculation
float distance = duration * 0.0343 / 2;
Exercise 1: Debugging Excercise
|
Objectives: Measuring Distance: The HC-SR04 Ultrasonic Sensor
Description: Using sonar to measure distance to an object. Creating a simple digital tape measure or obstacle detector. Your goal is to fill in the gaps (underscores) in the provided C++ sketch. Use the instructional comments for each GAP to insert the correct Arduino commands needed to initialize the Serial Monitor and perform the complete ultrasonic sensor measurement cycle. |
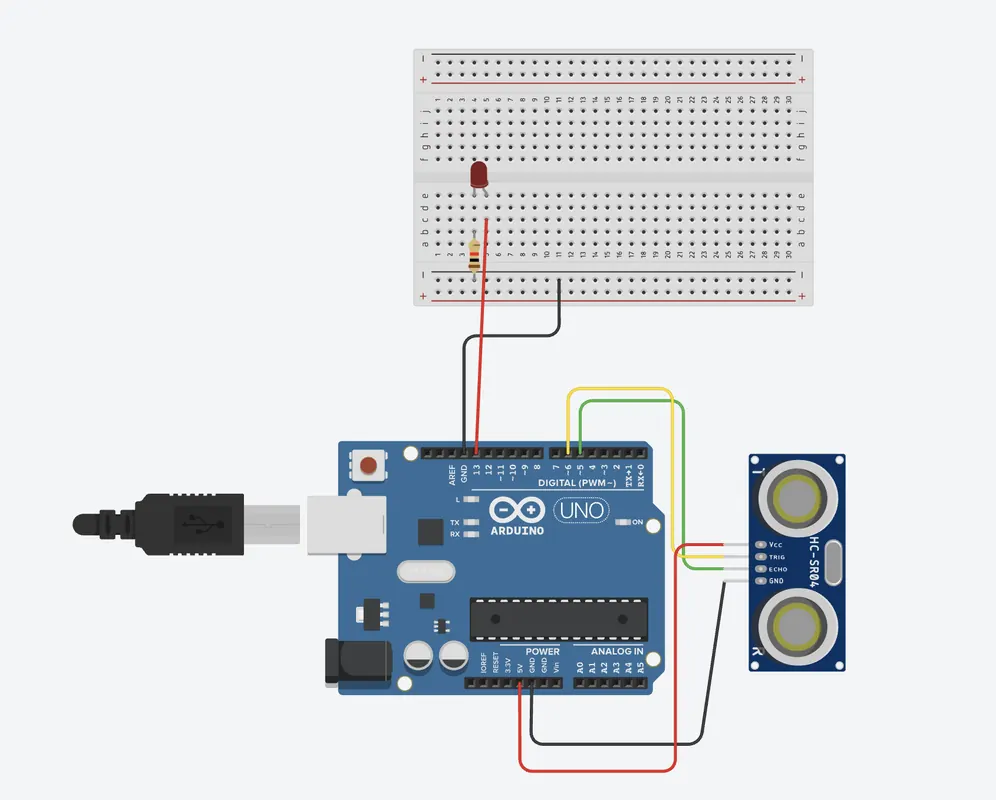 Click the image for the simulation
|
Ultrasonic Sensor Practice Template
int trigPin = _______; //#HINT  - check up on connected pin
int echoPin = ________; //#HINT  - check up on connected pin
long time;
float distance;

void setup()
{
  pinMode(trigPin, ____________); // SETTING OUTPUT PIN
  pinMode(echoPin, __________); // SETTING INPUT PIN
  Serial.begin(_________); // INITIALISING THE COMMUNICATION set it up for 9600
}

void loop()
{
  digitalWrite(trigPin,____________);  //# HINT - set up state to be LOW
  delayMicroseconds(2);

  // transmitting sound for 10 microseconds
  digitalWrite(trigPin, ___________);  //# HINT - set up state to be HIGH
  delayMicroseconds(10);
  digitalWrite(trigPin, __________);  //#HINT - based on lecture materials choose mode LOW or HIGH

  // calculating distance
  time=pulseIn(echoPin , HIGH);
  Serial.print("time: ");
  Serial.println(time);
  _____________ = time * 0.0343/2; //#HINT - check up variable used in distance

  // Printing out the final output => distance
  Serial.print("Distance:");
  Serial.println(______________); //#HINT - decide which variable should be shown

}
Exercise 2: Distance indicator
In this exercise, you will complete the logic to turn on four separate LEDs based on four independent distance checks. The goal is to set the specific distance thresholds and the necessary logic to turn the LEDs OFF when the object is outside of that range.
Challenge: Fill in the blank lines (underscores) within the void loop() function.
Correct LED initialization: Complete code by choosing correct digital pin matching Arduino Board
Distance Thresholds: Insert the correct distance value (30, 60, 90, or 120) into each if statement's condition.
LED OFF Value: Insert the correct constant (HIGH or LOW) to turn the LED off in each else block.
Challenge: Fill in the blank lines (underscores) within the void loop() function.
Correct LED initialization: Complete code by choosing correct digital pin matching Arduino Board
Distance Thresholds: Insert the correct distance value (30, 60, 90, or 120) into each if statement's condition.
LED OFF Value: Insert the correct constant (HIGH or LOW) to turn the LED off in each else block.
Ultrasonic LED Distance Indicator Template
int trigPin = 6;
int echoPin = 5;
long time;
float distance;

const int led1 = _______; //  HINT check connected pin on Arduino Board
const int led2 = ________; //  HINT check connected pin on Arduino Board
const int led3 = _________; //  HINT check connected pin on Arduino Board
const int led4 = ____________;//  HINT check connected pin on Arduino Board

void setup()
{
  pinMode(trigPin, OUTPUT); // SETTING OUTPUT PIN
  pinMode(echoPin, INPUT); // SETTING INPUT PIN
  Serial.begin(9600); // INITIALISING THE COMMUNICATION
  pinMode(______, OUTPUT);  // HINT: Use led1 variable
  pinMode(______, OUTPUT);  // HINT: Use led2 variable
  pinMode(______, OUTPUT);  // HINT: Use led3 variable
  pinMode(______, OUTPUT);  // HINT: Use led4 variable
}

void loop()
{
  digitalWrite(trigPin,LOW);
  delayMicroseconds(2);

  // transmitting sound for 10 microseconds
  digitalWrite(trigPin, HIGH);
  delayMicroseconds(10);
  digitalWrite(trigPin, LOW);

  // calculating distance
  time=pulseIn(echoPin , HIGH);
  distance = time * 0.0343/2;
  Serial.println(distance);

// We use decreasing distance ranges for increasing levels (more LEDs = closer object)


  if (distance <= _________) { // #HINT distance should be less or equal to 30 cm
     digitalWrite(led1, HIGH);}
  else {
     digitalWrite(led1, __________); //HINT → what value should be to turn led off
  }
  if (distance <= ________) { // #HINT distance should be less or equal to 60 cm
     digitalWrite(led2, HIGH);}
  else {
     digitalWrite(led2,__________); //HINT → what value should be to turn led off
  }
  if (distance <= ________) { // #HINT distance should be less or equal to 90 cm
     digitalWrite(led3, HIGH);}
  else {
     digitalWrite(led3, _________); //HINT → what value should be to turn led off
  }
  if (distance <= ____________) { // #HINT distance should be less or equal to 120 cm
     digitalWrite(led4, HIGH);}
  else {
     digitalWrite(led4, ________); //HINT → what value should be to turn led off
  }
}